Learn You Some Homelab

Roughly two years ago, the YouTube algorithm blessed me with a video by Wolfgang's Channel, in which he goes through a minimal home server build. I remember that I was already playing with the idea of a homelab beforehand and had already discussed the topic with some colleagues of mine. However, in hindsight, said video was the definitive starting point of a (somewhat expensive) rabbit hole that I can confidently say will stick as a permanent hobby.
What is a homelab?
Simply speaking, a homelab is anything that will allow you to host your own services. It can be an old laptop, a Raspberry Pi, or some tiny or big rack setup. The cornerstone idea of having a homelab is ownership. Having full control over said hardware and software - hence the "home" in lab. Similarly, the "lab" part in homelab signifies that this is not a foolproof, failsafe environment, but rather a playground in which experimentation is a core philosophy.
That last part is an important disclaimer to anyone considering a homelab: owning a homelab is a hobby and, as such, will require a time (and money) investment. It is up to you to decide if the time and money investment returns enough joy and other benefits to be a net win for you. This rather informal equation is different for everyone. Some might totally dread owning a homelab and might be more content with a VPS or SaaS subscription. Simply put, with ownership comes responsibility.
Why I got myself a homelab
The initial driver was having powerful enough hardware that I could use to run work-related experiments without any restrictions or red tape. A lot of my work is focused on cloud-native and distributed system design. A big centerpiece was Kubernetes and its associated CNCF ecosystem. Sometimes I needed to quickly test a combination of tech, like Istio paired with another CNI, to check if some features worked as expected. Although a lot of CNCF projects do follow best practices and open standards - like in the case of CNIs, which should follow the CNI spec - actual parity with and full coverage of those standards is not always guaranteed. Usually, I would build a test setup in the lab environment at work. Although it was a fairly open environment with more freedoms than at previous employers, for really small-scale experiments, the amount of red tape needed was still too much at times (like DNS, enough capacity, direct network access, proxy and VPN bugs, etc.).
Finally, after some banter with colleagues who already had a homelab and watching said video from Wolfgang's Channel, I went on eBay and started sourcing my first homelab.
Iteration 1: Three Ugly Ducklings with a Switch ( 6 months)
My first use case for my homelab was to allow me to set up different clustered services like Kubernetes or Kafka. Initially, I had read about Raspberry Pi labs, which I liked because of the small footprint. Luckily, two things prevented me from erroneously going down that road. First, I needed devices that would allow me to run x86-64 compiled software. Second, Raspberry Pis surged in price a lot back then and were too expensive for the power they provided.
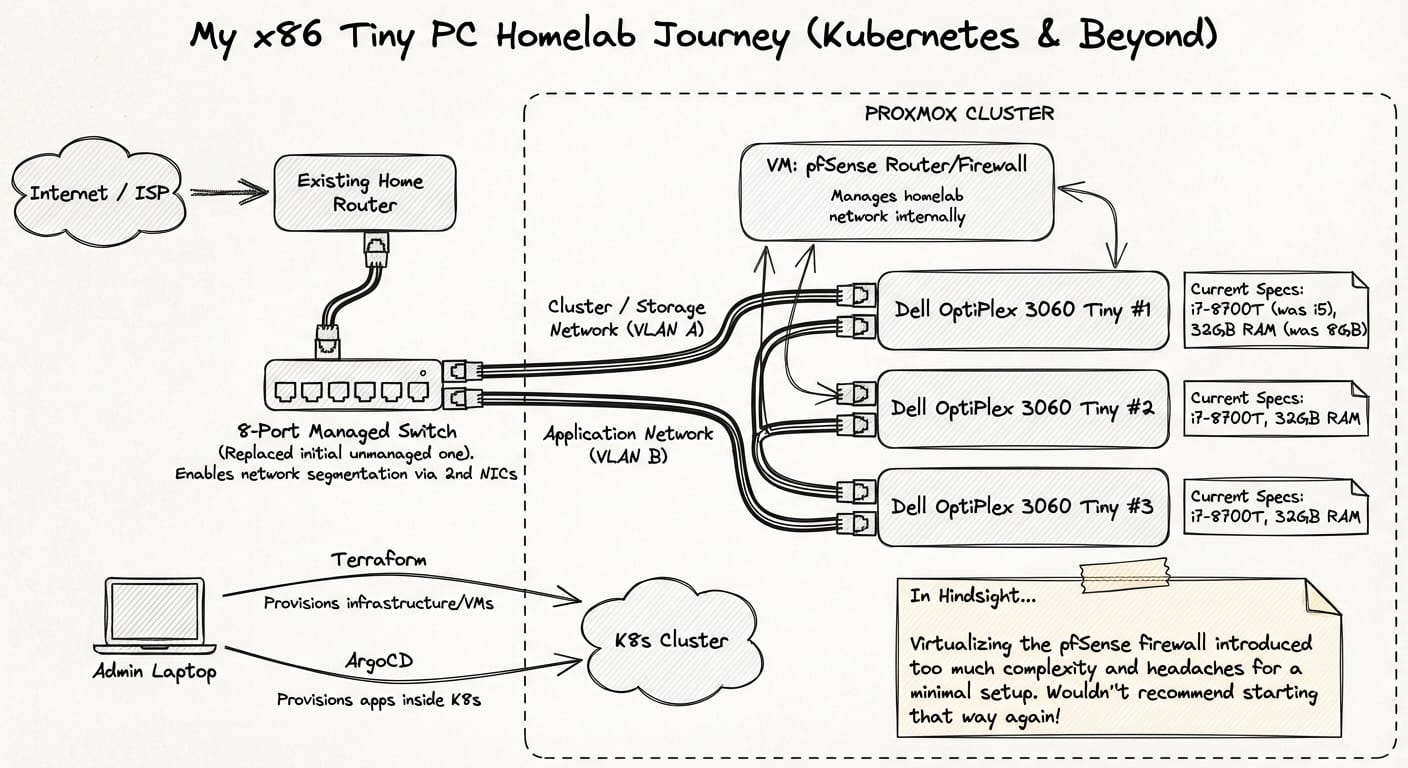
Luckily, I stumbled upon a post on Reddit about tiny office PCs. I did some research and chose to go with three Dell OptiPlex 3060s, which I got for roughly 80 Euros each on eBay. Each was equipped with an i5 8500T and 8GB of RAM, which was enough to get started. As my home router did not have enough network ports, I added an 8-port unmanaged switch and was good to go. All three nodes were provisioned as a Proxmox cluster. If I needed to create a fresh Kubernetes cluster, I would use Terraform against Proxmox to get the nodes ready and use ArgoCD to provision anything inside the cluster as needed.
This worked pretty well, and those small Dell 3060s are still part of my homelab today. The only small changes that occurred were upgrades of the processor to an i7-8700T and maxing out the memory to 32GB for each node. Additionally, I swapped the unmanaged switch with a managed one to allow each node to have a second NIC, which enabled me to separate the cluster and storage network from the application network. The homelab network was managed by a virtualized pfSense router, which was fine, as no other devices apart from the Proxmox nodes were part of the network so far. Though, in hindsight, I would not recommend virtualizing your firewall. It just introduces a lot of complexity and headaches - at least in a minimal homelab setup like this.
Iteration 2: Moving (6 months)
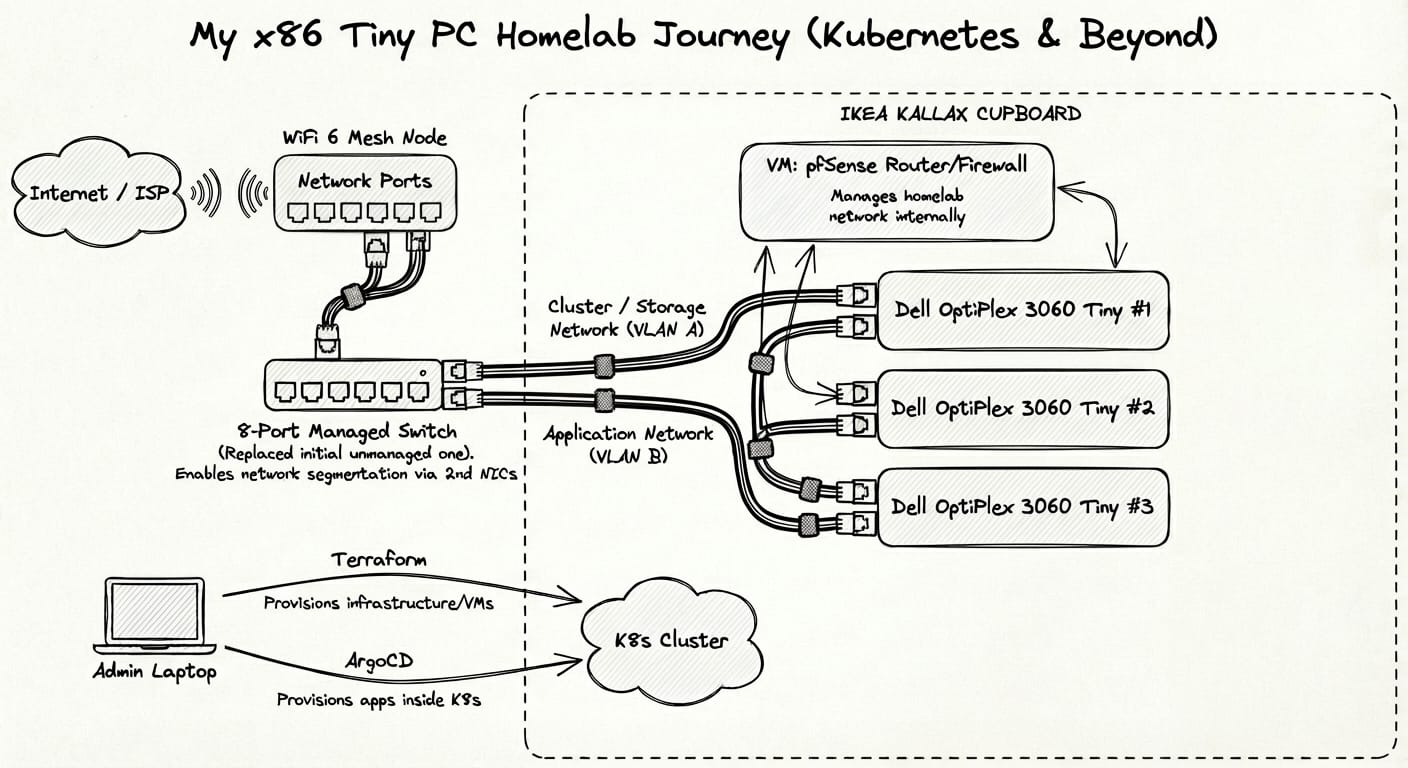
Simply put, the previous setup was a visual mess. Although I tried to keep it tidy, it was a big tangled mess of power bricks and network cables right beside the router and TV. I couldn't move the main router and did not want to lay a cable all the way from the router to my office room, so another solution had to be found. Luckily, my main router supported a WiFi 6 Mesh, so I got myself a compatible mesh device with enough network ports to bridge the gap. This allowed me to move the "Ugly Ducklings" to my work room, put them into a corner of an Ikea Kallax cupboard, and use some velcro cable ties for cable management. This made everything look a lot cleaner and actually more serviceable.
Iteration 3: Packing Up (12 months)
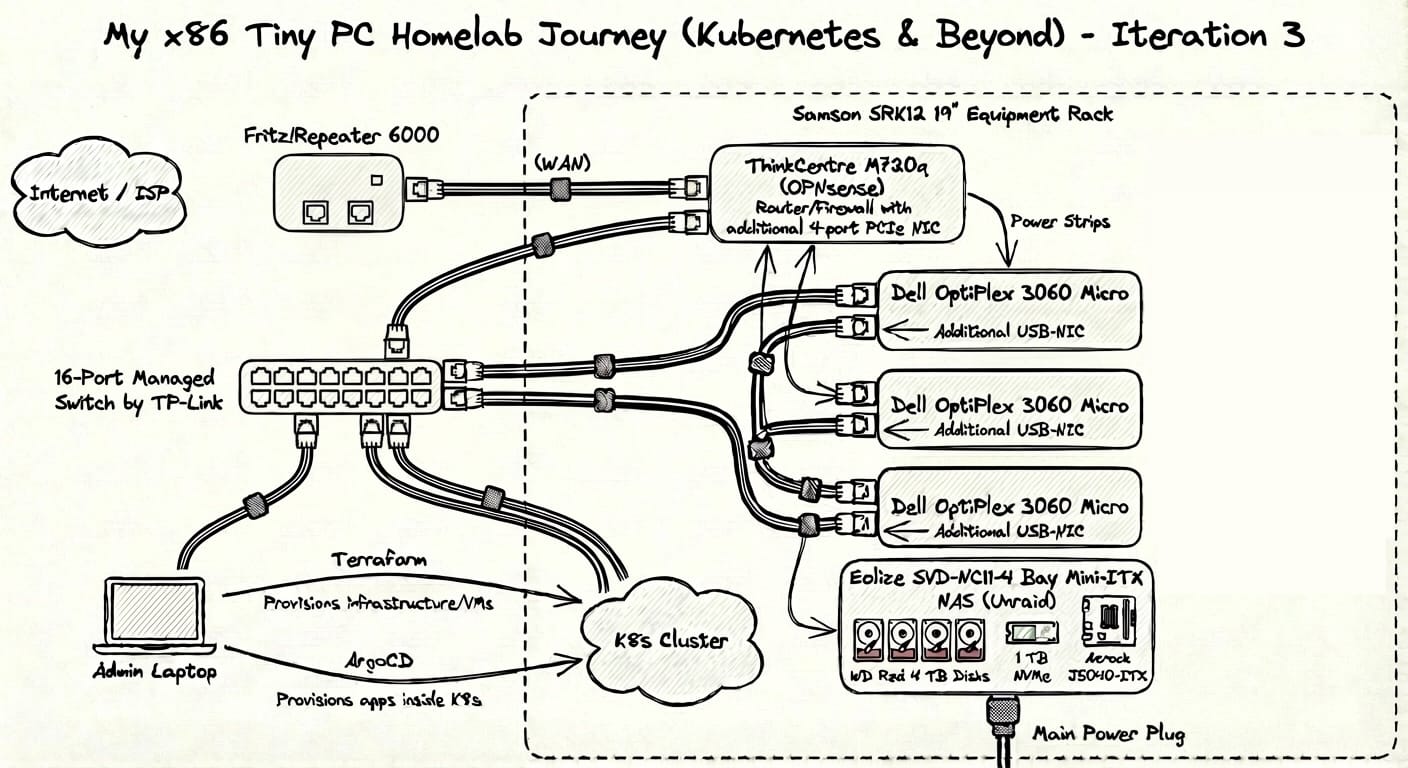
As already mentioned, having the router virtualized introduced some issues and added unnecessary complexity. I think the KISS and YAGNI principles also apply to homelabs and, if followed, make the whole journey more enjoyable. So, my next goals were to add a NAS, get a bigger managed switch, and streamline cable management. Additionally, I decided to put everything into a nice, small, and movable rack. The only cable going out of the rack should be the main power plug - everything else is contained and cleanly laid out. By the third iteration, the BOM looked as follows:
- Rack: Samson SRK12 19" Equipment Rack
- Proxmox / Kubernetes:
- Three Dell OptiPlex 3060 Micro, i7-8700T, 32GB Memory
- Additional USB-NIC for each OptiPlex 3060
- PiKVM
- Two power strips
- NAS:
- Eolize SVD-NC11-4 Bay Mini-ITX (Enclosure)
- 32GB RAM
- Asrock J5040-ITX
- Transcend JetFlash 32GB
- Four WD Red 4 TB Disks (CMR is preferable for NAS usage)
- 1 TB NVMe
- Unraid as NAS OS (chosen because of the option to mix and match disks)
- Networking:
- 16-Port Managed Switch by TP-Link
- Router / Firewall:
- ThinkCentre M720q, modded with an additional 4-port NIC via PCIe riser.
- OPNsense as Router OS (previously pfSense)
Iteration 4: Resilience (currently)
During Iteration 3, my main usage went from work and open-source-related experiments to hosting services that would replace some of my subscriptions and help with general tasks. Examples include Dokploy to manage and deploy apps, Paperless for documents, Immich for photos, and many more.
While I was on a business trip trying to access services remotely, new neighbors moving in back home triggered the breaker for the entire floor. This forced a shutdown and unclean reboot of some devices. Although power outages don't really happen where I live, I wanted to make sure that, in case of short interruptions, all devices in the rack could be sustained for a short period. Therefore, I got myself a massively oversized UPS (Eaton 5p 1550iR) at a steal.
Closing Thoughts
So far, I am quite happy with the current hardware config. One next project might be to move my NAS to a 2U rack enclosure and gradually upgrade parts of it. However, looking at recent consumer prices, I might hold off on this.